
Hope you have installed WordPress successfully. So what’s next?
Do you think that it’s time to write your first blog post on your brand new blog?
I don’t think so.
Even though it seems that your blog is ready, you’d be surprised at the number of essential settings that need to do before you can say your blog is ready.
But don’t worry!
It won’t take much of your time, Just follow the steps to complete your WordPress blog settings and you’ll be ready in no time.
In this post, let me share the 27 essential WordPress settings after a installation.
Now, if you want to start a blog, I have an easy step-by-step guide.Have a look!
27 Essential WordPress Settings after Installing WordPress
Basic Settings:
1. Reset Your Password
Changing your password is the first thing that you should do after logging in to your dashboard.
Never set a weak password that is easy for a hacker to crack. Either set a strong password or you can use WordPress’s built-in tool to generate a strong password for you.
You can do it by clicking Users > Your Profile from the WordPress menu.
In the Account Management section, click on the set new password button to generate a strong new password.
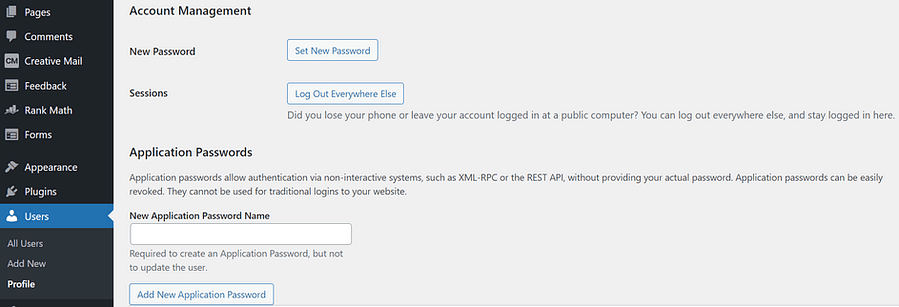
A new password will be generated and visible on the screen. Copy the password and save it in a safe and secure place, like a password manager, then click the Update Profile button.
Now you will be logged out and will have to log in using your new password. If you haven’t saved it, you won’t remember it, and end up having to reset it.
2. Check for WordPress Updates
Keeping your website up to date with the latest WordPress versions is important for security, bug fixes, and getting the most up-to-date features on your website.
If your host installed WordPress for you, then there is a good chance that you’ll need to update WordPress.
Usually, you’d see a notice inside your admin panel window prompting you to update. But, you can also check for updates manually by visiting Dashboard > Updates.
3. Delete Default Post, Page, and Comment Content
WordPress comes with default dummy content that includes a sample post, page, and comment. Delete those unwanted contents to assure your visitors don’t see that unwanted content once they start visiting your website.
Go to Posts > All Posts and delete the default “Hello world” post.
Similarly, go to Pages > All Pages and delete the default “Sample Page”.
Also, click on “Comments” and delete the default comments.
4. Delete unused Themes
The WordPress installation comes with the default theme. Furthermore, you may have tested a few themes. So once you finalized and activated your theme, delete all unused themes to save space.
Go to Appearance -> Themes and hover over the theme and click on Theme Details. Then, press Delete from the bottom-right corner.
5. Update/Delete Existing Plugins
WordPress has a few default plugins which are pre-packaged with the setup. If WordPress is installed by your hosting provider, then they might also include a few additional plugins with your setup.
It is important to delete unused plugins to free your space.
To delete a plugin, first, you have to deactivate that plugin. Once it is deactivated, you can see the delete option to remove that plugin. Now click it and you are done.
Also, It is important to update your existing plugins up to date to reduce the chances of your website being hacked. Regular updates provide security and compatibility.
Because these outdated versions of plugins might have bugs or security holes that can be exploited by hackers.
Go to Plugins > Installed Plugins and check if any of the plugins have updates available. If available, then click update.
Most of the hosting comes with an automatic update option. The Bluehost control panel has an option for automatic plugin updates.
If you enable it, all your plugins will be updated automatically.
Isn’t it amazing?
6. Clean up Your WordPress Dashboard
The WordPress dashboard is the first thing that you see when you log in. You should clean and optimize it regularly to be productive.
You can do it by clicking the screen options from the top right corner. Now you can
see a list of all the widgets that are currently visible on the dashboard.
Uncheck the unwanted widgets and keep them clean.
7. Customize Your User Profile
Complete your profile by filling in the details under Users > Your Profile.
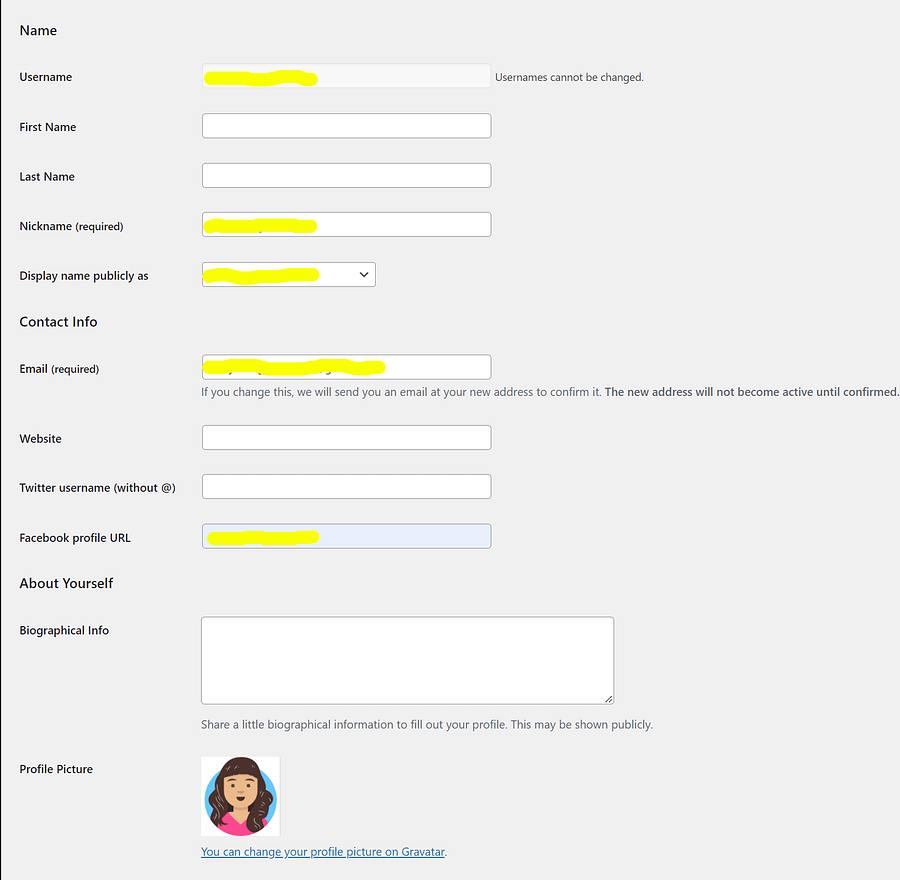
By default, WordPress uses the username you use to log in to your dashboard as the name that appears on your blog posts and comments.
Your author profile is visible on each of your website’s posts. When a user reads some content that you’ve written, they might be eager to know more about you. The author profile is the perfect place where you can share information about yourself, and your social media handles so that the user can follow you instantly.
You can change this by changing the dropdown labeled as “Display name publicly“.This dropdown shows options based on your first name, last name, and nickname.
Users:
8. Add Users to Your Website
If more than one person is contributing to your blog then you can add users from Users > Add New.

Fill in the proper information in all the fields and click the “Add New User” button. Make sure to check the “Send User Notification” checkbox so that the new user gets an email about their new role. Don’t forget to choose the correct role for the user.
WordPress General Settings:
This is the first section under your settings menu. Here you can edit the basic information of your blog.

9. Site Title And Tagline
Both Site titles and taglines are important factors in your blog.
The default tagline for a WordPress website is “Just another WordPress site“.You have to edit your tagline according to your blog.
The tagline is a short memorable description that provides the overall view of your blog. A tagline can be a slogan or can possess your primary keyword.
It should be short, memorable, and describe the title.
For example,
ShoutMeLoud’s tagline is “Same vibe attracts same Tribe“
Domino’s tagline is “Great Taste, Delivered Safe“
KFC’s tagline is “Finger Lickin’ Good (KFC)“
The tagline of Moz’s is “SEO software for smarter Marketing“
Ahref’s tagline is “SEO Tools & Resources the grow your search traffic“
“Content Marketing Tools and Training” doesn’t have any fancy words but it still does the job of explaining what Copyblogger is known for.
Where do I see the website tagline?
The tagline displays after the title in the browser tab.
Does Google show a tagline in SERP?
It depends on how relevant Google sees your tagline. Sometimes, Google may choose another relevant text to display in the SERP. You can also choose a specific meta description that appears exclusively in Google.
Usually, a site tagline appears in the link description, on SERP. So it plays an important role in raising people’s interest and has a direct impact on the Click-Through-Rate.
Is the tagline necessary for a blog?
Yes, It is. It completes the title by providing some more details about the topic of the website. If it is well-written and relevant to your website it might boost your SEO.
How long should a tagline be?
The tagline should be catchy and relevant. It should not be more than seven or eight words.
How to write a perfect tagline?
- Make sure your tagline provides a clear picture of your blog content.
- Instead of telling them what you have to offer, Showcase to them what they’ll receive.
- Write about what benefits your readers get from your blog. It attracts your target audience.
- It should be catchy and memorable.
- It should increase curiosity for further exploration of the site content.
- You can begin by writing the benefits your customers receive from your blog.
- Think of how you could describe it with a few words.
- Play with the words and come up with a few taglines.
- Compare them and choose the best.
10. WordPress Address and Site Address
WordPress Address is the address where all your WordPress files and folders are stored.
Site URL is the address that people type in their browsers to reach your website. ie, your domain name.
By default, the two addresses are the same. But in some circumstances, you can change them. Why?
Here are a couple of the reasons :
1) Only a part of your website is WordPress-based. Most company websites use WordPress only for their blog.
For example, if WordPress is installed into a directory called “blog”, then the WordPress address would be https://sampledomain.com/blog (where sampledomain.com is the domain name). If WordPress is installed into the web root, this address will be https://sampledomain.com.
2)You want to install WordPress in some different folders to keep your root directory free.
11. Administrator Email
Most of us use our personal email id while installing WordPress which leads to receiving notifications when someone leaves a comment, fills out your contact form, or something that you receive email alerts for, in your personal email.
To avoid this, you can change it to your active business mail id.
Remember, WordPress will send a confirmation email to it before changing your administrator email id.
12. Timezone and starting day
Make sure to set your timezone according to your local time so that it will be easy for you to schedule post-timings. when you schedule posts, they will go live according to your time.
Some bloggers change their timezone according to the majority of blog visitors’ timezone. This will decrease the confusion about the date of the published post, comments left on blogs, etc. Also, it plays an important role in e-commerce websites when it comes to orders.
It’s up to you. I would suggest you set it according to your local time.
Also, you can pick which day to start the week under the label “Week starts on“.
13. Membership
By checking “Anyone can register”, you can allow users to register in your blog for guest-posting, subscription, etc.
Also, you can set the “New User Default Role”.This option assigns the chosen default role to any new user who registers in your blog.
You can uncheck that option if you don’t want to allow users to register on your blog.
WordPress Writing Settings:

14. Default Category and Ping List
The category of your blog posts helps your site visitors to better understand the content of your blog posts.
You are required to assign at least one category to your blog post. If you don’t assign a category to a blog post then, WordPress automatically assigns it to the “Uncategorized” category.
If your visitors see a blog post with the category “Uncategorized”, it won’t look pretty. Isn’t it?
Go to Posts > Categories and click on the Uncategorized category checkbox, delete it and create a new category.
You can create any number of categories for your website.
Now, go to Settings > Writing and choose any new category you created from the dropdown menu as your default category.
By doing so, WordPress assigns this category to the blog posts if you didn’t assign any particular category.
WordPress Reading Settings:

15. Change the Homepage
By default, WordPress shows your site’s blogs on the homepage. However, you can use a static page as your homepage instead.
To achieve this, go to Settings > Reading and select the A static page option under Your homepage displays.
Then, select the required page from the home page and post page dropdown respectively.
16. Verify Search Engine Visibility
When you’re setting up your blog, you don’t want to search engines to index incomplete articles from your website. WordPress comes with an option for the same.
Go to Settings > Reading from the WordPress menu and search for the label “search engine visibility” and check that option.
When the option is checked, search engines will not index your website. No matter how well you have written and optimized your content. So your blog content will not appear in the search results.
When the option is unchecked: Search engines will index your website. So once your website is ready for launch, don’t forget to uncheck this option.
17. Discussion
It is important to set up your discussion settings inside WordPress.
Go to Settings > Discussion in the WordPress menu. check or uncheck the options under each label according to your need.
If you are not sure about that, just follow the below screenshot.

18. Gravatar
Gravatar is used to display photos in author bios and in WordPress comments. If you don’t have a Gravatar to use, WordPress uses the default mystery man. You can create your Gravatar at Gravatar’s website by using the email you used to set up your WordPress website.
Then, upload the image in your author bio and when you comment on your site. This image will be displayed on any other WordPress sites where you leave comments.
You can change the default avatars used for people that comment on your site that don’t have a Gravatar.
Go to Settings > Discussion, select the avatar you want under the default avatar label, and save changes.
WordPress Media Settings:
19. Media Settings
By default, WordPress creates multiple sizes of every image you upload to your site. This leads your website to bloat with unnecessary files that reduce your website’s speed and performance.
To avoid this, go to Settings > Media and set all the widths and heights to 0.

URL Settings:
20. Permalinks
Permalink is the short form of “permanent link“.This is the complete URL of the posts, pages, etc. The permalink is unique.
The default WordPress permalink is – plain ie, “https://yourdomainname.com/?p=123“
This is neither search engine friendly nor user-friendly.
So check “Post name” as your permalink and click save.

21. Change the Default Login URL
The default login URL for all WordPress websites is www.website.com/wp-admin.
So if I know any website that is developed in WordPress, I can easily access the admin panel login page. Yes, it is protected with a username and password. But when the URL is accessible it won’t be difficult for a hacker to hack.
The simplest way to prevent it is to change the URL itself. Hackers won’t be able to attempt any of the malicious things If they don’t know the URL.
You can achieve it by simply installing the plugin WPS Hide Login and following the instructions in the plugin to change your login URL. But make sure to make a note of your new URL.
22. Replace the WordPress Logo
The WordPress Admin panel login page comes with the default WordPress logo.
You can easily customize that page by adding your website logo or changing the background etc to look more professional.
You can achieve it with the help of WordPress plugins like
23. Stop WordPress Core Files from being Indexed
Google and other search engines can crawl your WordPress core files and folders. If your files are indexed on Google or other search engines are neither professional nor secure.
Imagine your important files are being listed in the search results for everyone to see. It’s not fair, right?
Also, it is not a good practice to allow search engines to crawl files or folders which you don’t want to be visible to the public.
So it is important to stop Google and other search engines from indexing WordPress core files and folders, by adding the following chunk of code to your robots.txt file.
User-agent:*
Disallow: /wp-admin
Disallow: /wp-includes
Disallow: /wp-content/themes
Disallow: /wp-content/plugins
Allow: /wp-admin/admin-ajax.php
24. Remove Meta Information from WordPress Header
By default, the WordPress header contains a bunch of information about your website. This information helps developers to understand the website or to diagnose the issues.
But this meta-information can be used by hackers for malicious purposes. So it is a good practice to disable meta-data in WordPress to avoid unwanted problems.
you can achieve it by adding the single line code inside your theme’s functions.php file.
remove_action(‘wp_head’, ‘wp_generator’);
25. Disable HTML in WordPress Comments
Most of us have experienced spam comments even after installing an anti-spam plugin. You can block those spam comments by disabling the HTML in your comments. Since spammers won’t get any benefit out of commenting without HTML, they will leave your website alone.
To disable HTML inside your comments, add the following code to your theme’s functions.php file.
add_filter(‘pre_comment_content’, ‘wp_specialchars’);
26. Disable Post Revisions
WordPress comes with a built-in post-revision system that backs up your posts every time you make any changes.
Even though it is an amazing feature, it slows down your website. Imagine if each of your posts has 5 revisions, your website server will have to manage 5 times the content of your original post.
You can either disable this option for best performance or you can limit it to the least number.
To disable post revision, add the following piece of code to the wp-config.php file.
define(‘WP_POST_REVISIONS’, false)
If you’d like to limit the number of revisions, add the following code to the wp-config.php file.
define(‘WP_POST_REVISIONS’, 2) will save 2 revisions.
27. Setup a Coming Soon Page
You may feel that your blog is ready once you are done with all the basic settings. But unfortunately, your blog is not yet ready for visitors.
There should be at least 5-10 posts should be there to feast on your visitors.
Until then, you can set up a coming soon page on your website. Having a coming soon page is similar to having a “We’re opening soon” sign outside a store. Same way, you can advertise your blog launch even before you’re ready to launch.
A well-designed coming soon page will help you to attract visitors even before your blog launch.
There are many plugins available to create your coming soon page on your website. Launcher is one of the famous free plugins to create a coming soon page. Just install the plugin and follow the instructions to create a Coming Soon page.
Conclusion
I hope I have covered all important basic settings before your blog launch.
Are there any default WordPress settings that have been left off this list that you think are worth adding? If so, we would love to hear all about it in the comments below!